Gearing Up for a Very Long Ride: Equipment for Cycling from Alaska to Patagonia

Warning: We know that some of you who read our blog are not cyclists. This post contains lots of cycling jargon and specifics about equipment that may not interest you. If so, you may want to skip this post (the next post will be less technical). Cycling and lightweight camping enthusiasts should read on…
By now we have a fair amount of experience with long-distance bike touring on three different continents. We’ve pedaled our way through fierce winds in the Sahara Desert, record-high heat waves in France and the central USA (with temperatures exceeding 110 F/43 C), the damp chill of Northumbria and Scotland, and frosty mountain mornings. We’re comfortable cycling across large, unpopulated areas where there are no sources of food or water for multiple days (e.g., the Navajo Nation and northern Sudan). And our tours have included extended travel on all types of road surfaces from smooth pavement, to well-graded gravel, to rough and rocky 4x4 trails, and overgrown single-tracks. All of this has given us a pretty good idea of what types of gear serve us best in different situations.
Our Previous Gear Set Has Served Us Well
Given some of the rough, off-road sections that we plan on riding on this trip (like the Baja Divide), we decided to use our bikepacking set-up rather than our more traditional, road touring bikes. The path we have chosen to take us from Alaska to Patagonia will be familiar in some ways. It has a lot in common with our most recent bikepacking trip on the Western Wildlands Route (WWR), such as a mix of on-road and off-road cycling. The WWR also led us through a fairly wide range of weather zones, from the mountains of Montana to the deserts of Arizona. In the end, we were pretty happy with the kit we had with us on that ride. So, it made sense for us to use our gear list from the WWR as a starting point when planning for this trip.
But the journey from Alaska to Patagonia will be way longer. It will cover around 22,000 miles (35,400 km) - nearly eight times farther than the WWR. Clearly, there will need to be a few adjustments. If you’re interested in the full list of stuff we will have with us on this trip, take a look at our WWR gear page, then read below about how we’ve modified that list.
The Bikes
Overall we were very pleased with the performance of our bicycles on the WWR. They have been reliable and easy to repair, which is important for long distance travel in remote areas, where we often find ourselves. The bikes were very responsive, and easy to handle on some pretty steep and rocky/loose terrain. They also cruised along surprisingly well on the open road. As noted below, we were particularly satisfied with some of the components. Others may not have hit a home run, but they served well enough that it doesn’t make sense to go to the trouble and expense of replacing them. Our final changes to the bike setup were limited to a couple of very specific things that we think will significantly improve our riding experience.
Here are a few comments on the bike components that we felt worked the best:
Tumbleweed Prospector Bike Frames. Sturdy, responsive, and able to tackle challenging terrain. We both noted how well these bikes handled, especially on slippery gravel or rocky and rutted tracks through the mountains.
Rohloff Speedhubs (14-speed). The internal gearing worked great. Shifting was easy, and we had plenty of low gears to work our way up steep hills. It was especially nice to enjoy the peace of mind that comes from not worrying about whether we might damage a fragile derailleur, or wear out and have to replace cassettes.
Selle Anatomica Saddles (H2 for him, X2 for her). These saddles proved to be both durable, and quite comfortable - just the balance we were looking for. We did have a rivet go missing on one of the saddles, but the manufacturer was very responsive in sending us some replacements. We now have a few spare rivets in case it happens again.
Avid BB7 Disc Brakes, Catalyst Pedals, Tumbleweed Mini Pannier Racks, King Titanium Manything Cages, and Zefal Spy Mirrors. We don’t have a lot to add about these components. All performed well and we’ll be sticking with them for the Alaska to Patagonia trip.
Other Components We’re Keeping, with Some Caveats
KOGA Denham Handlebars. We like the fact that the “horns” offer a variety of hand positions, which helps reduce numbness in our hands. But when riding at speeds over 12 mph (20 kph), with our hands on the horns, we both found that the handlebars shimmied uncontrollably, causing the whole bike to shiver (not a particularly safe feeling). This seems to primarily happen when there is significant weight on the front of the bike. We carry 1.5 liter water bottles on each fork. When the bottles are empty, there is significantly less shimmy than when the bottles are full. Furthermore, the bars hold perfectly steady at all speeds with hands positioned on the bar ends rather than the horns. In the end, we decided it wasn’t worth changing handlebars because of this issue. But it’s a shame, because it’s when you’re going fast that you’re most likely to want to lean forward on the horns, in an aerodynamic position.
Schmidt SON28 Dynamo Hubs. It was not 100% clear whether the dynamo hubs were a smart piece of equipment to take on the WWR. The hubs add weight and charge devices at a very slow rate. When cycling off-road, your average speed is typically slower than when on pavement. That further reduces your ability to get a good charge with dynamos. On the WWR, our average speeds just weren’t high enough on many days to deliver a lot of charging capacity. That said, PedalingGuy did find the hub useful for occasionally recharging his spare battery. This helped to ensure we always had enough power for his phone, which was our primary navigation tool. And PedalingGal (whose charging needs were considerably less) was able to keep her backup battery topped up. For the Alaska to Patagonia cycling trip, there will be times when we’ll have longer stretches of riding faster on the pavement, as well as longer stretches away from electric plugs for charging. So we’re expecting the dynamo hubs to provide more value on this upcoming journey.
Click-Stands. Having used sturdy, double-leg kickstands on our previous bikes, it’s been hard to make the switch to Click-Stands. But the fact remains that our Tumbleweed Prospectors are not built to accommodate traditional kickstands, so the Click-Stands are the next best thing. We will continue to use them on this bikepacking trip. But there’s no denying that we both lay our bikes down on the ground more than we would like to because of the extra time and effort it takes to securely prop up a loaded bikepacking rig on a Click-Stand. A strong wind also has much more of a tendency to tip the bikes over when using Click-Stands vs. traditional kick stands.
The Changes to Our Bikes
Tires. This was a tough one. Many hours were spent agonizing over the right “tire strategy” for this trip. We would settle on one approach, only to later second-guess ourselves and rethink the entire plan. The basic problem is that there are a huge range of riding conditions on the route from Alaska to Patagonia, and no single type of tire will be ideal for all of the surfaces we’ll encounter along the way. Moreover, the type of mountain bike touring tires we use tend to have a relatively short life compared to traditional road bike touring tires. Bikepacking on dirt roads across the Americas also is likely to lead to shorter tire life-spans. For example, with the battering that our Schwalbe G-Ones took on the WWR, they were limping along on their final treads by the time we reached the Mexican border after only 3,300 miles (5,300 km) of mountainous, off-road terrain. This is a long way of saying that we have to plan on going through 4-6 sets of tires over the course of the whole journey. Here’s what we decided for the first 10,000 miles:
Maxxis Rekon+ 27.5”x 2.80” Tires. Alaska to Montana (3,300 mi / 5,300 km). We mounted these tires for the start of the trip in anticipation of muddy conditions on the Dalton, Denali, and Top of the World highways, which are dirt roads dispite being called “highways”. If it rains as much as expected, we’ll be glad to have the more aggressive tread these tires offer. But if there’s a drought in 2022, we’ll be cursing the choice - especially when cycling on the extended, paved sections.
Schwalbe G-One Allround 27.5”x 2.80” Tires. Montana to Southern California (2,500 mi / 4,000 km). This section is likely to have a large amount of pavement, so the fast-rolling G-Ones were the obvious choice. They performed great for us on the WWR. (Truth is, we almost went with G-Ones for the start of the trip in Alaska as well, but everyone says they don’t handle mud well at all. Hope that was the right choice…) We already have these tires pre-purchased, and they will be sent with some other things that we plan to have mailed to us once we cross the border from Canada back to the USA.
Maxxis Chronicle 27.5”x 3.0” Tires. We will use these from Baja California, until they need replacing. We wanted tried-and-true 3.0” tires to tackle the off-pavement, sandy conditions we anticipate in Baja. Fortunately, we were able to track down some of the last 27.5” Chronicles available, since they have now been discontinued. These tires are legendary for being both fast-rolling and mountain capable. None of the bikepacking tires available today seem to have the same magic properties. We’re going to have our precious Chronicles shipped to us in Southern California, and ride them as long as we possibly can. Who knows? Maybe they’ll make it all the way to Panama, or futher! (6,000 miles / 9,600 km).
Reserve Wheels Fillmore Tire Valves. You’ve probably heard of Presta valves and Schrader valves. Well, there’s a new kid on the block, called Fillmore valves, that just recently became available. They’re compatible with Presta tire pumps, but they’re specially designed to work better with tubeless tires. On the WWR, we used Presta valves with removable cores (for adding tire sealant). But Presta valves were invented in the days before tubeless tires, and they just don’t get along well with sealant. They often get clogged. And the valve opening is very small, making it challenging to push through a large enough volume of air to seat the bead when installing new tires. When our valves became clogged, they were very difficult to open without using pliers (a pain, especially out on the trail). Sometimes we had trouble forcing air into the tires through the gummed up and compromised valve tubes. While Presta valves and cores are inexpensive and widely available, replacing them is a still a big inconvenience. We often cycle in remote areas without access to floor pumps, and our little hand pump gives such a good workout that we prefer to use it only when topping off tires or for emergencies. As a result, we find that we are rarely inspired to replace a Presta valve, no matter how clogged it becomes. So we decided to try out the new design of Reserve’s Fillmore Valves. Based on our initial experience with the new valves, we are suitably impressed. They have noticeably better air flow, you can let out air from the tire without removing (and inevitably losing) the valve cap, and the valve seems less likely to clog. They are expensive, but they should last a long time. And if they preform as well as hoped, they will be worth it.
One issue we encountered was that the small tire pressure gage we used previously (the little blue one made by Schawalbe) did not work on the new valves. So we had to purchase a different model made by Topeak (see below). We were also perplexed at first as to how we would get sealant into the tires through the valve (since the core is not removable). It turns out that the tube that comes with the Rolhoff Speedhub oil change kit works perfectly. It forms a tight fit around the valve on one end, and the 2 oz Stans Sealant bottles form a good fit with the other end. Because the Fillmore valves have a larger diameter, the sealant flows into the tire through the valve well enough even without a removable core. Since we have two Roloff hub bikes, and we change the oil in both of them at the same time, we usually have an extra, unused oil kit tube around. Even if you clean the tube after adding sealant, I would not chance then using the same tube for a hub oil change. I’m sure there are other ways to solve this problem (i.e., adding sealant through a gap between the wheel rim and tire), but this solution worked well for us.
Ergon GC1 Handlebar Grips. The Tumbleweed Prospector bikes came with Ergon GS1 grips. The GS1s are certainly high-quality, lightweight grips. But according to Ergon, they are not ideal for handlebars with a lot of sweep (like the Denham Bars we are using). The GC1 grips (also by Ergon) have a larger area of support for your hands, a softer, more flexible pad to absorb extra vibrations from the road, and are ergonomically better designed for bars with a lot of sweep. Supposedly the GC1s improve hand and wrist posture, and reduce harmful pressure points. These grips were noticeably more comfortable right out of the box, so we’re hopeful that they do the trick in reducing strain on our hands.


Luggage
All of the major components of our luggage system have remained the same. PedalingGuy did add one small, additional bag, and we both shed some weight by reducing the number of extra straps and bungee cords we were lugging around.
Topeak Aero Wedge Seat Pack (medium). PedalingGuy needed a bit of extra storage that would be easily accessible during rides. At 4.6 oz, this bag isn’t too heavy for its volume. And the large opening makes it easy to access whatever’s stored inside. Since we already owned this bag for our road bikes, we decided to give it a try and see if the extra space is worth the extra weight.
Bungee cords and other straps. Overall we reduced our combined weight by about 12 oz by shedding extra cords and straps we had been lugging around. We’ve decided that the ROK straps, which can expand quite a lot, will be sufficient to tie on any extra items we may need along the way.
Clothing and Shoes
Lightweight Skull Caps. Acknowledging that we’ll probably face colder conditions on this cycling trip, we each brought a lightweight (0.6 oz) cap that can be worn under our helmets when on the bikes.
Full-Length Gloves. PedalingGuy added a pair of simple, inexpensive knit gloves for extra warmth (he didn’t bring any on the WWR ride) which will get discarded once we hit warmer temperatures.
Bug-off Neck Buffs. PedalingGal had one on the WWR trip, but PedalingGuy didn’t. This time he’s bringing one along. These buffs help in cold weather. However, their bug-off properties will perhaps be even more important while cycling through, and camping among, the clouds of arctic and boreal mosquitos and black flies.
ExOfficio Bugs-Away Santelmo Pants. These replaced PedalingGal’s yoga pants. They weigh 3.0 oz less, plus they should help repel biting bugs. If you see a theme emerging here, it’s because we’ve taken to heart the warnings we’ve heard about how bad the mosquitos and black flies can get along our route.
Baseball Hats: Buff Pack Trek Cap (him) and Parapack P-Cap (her). We both switched out our former baseball caps for new, lighter-weight options. These hats each weigh about 1 oz, and are more packable than the hard-brim hats we used before.
Sleeping Gear
We are sticking with our Hyperlite Mountain Gear UltaMid 4 tent (a.k.a., the Taj). Its very roomy, interior space and surprisingly low weight (for its size) make for a hard-to-beat combination. However, we will be taking a couple of extra stakes and guy lines for additional tent stability in windy conditions. Although the UltraMid 4 is considered one of the better tents for windy conditions, along the WWR we had a couple of sleepless nights when the Dyneema fabric made a racket flapping in the wind (and occasionally started pulling our stakes out of the ground). That was partly our fault because we did not take the full complement of stakes and guy lines, in order to save weight. We’ll sleep better knowing the tent has a few more anchors to keep it from flapping in a stiff breeze.
There is no perfect tent, and one of the big downsides of the UltraMid 4 is that it is not free-standing. There are many situations where a free standing tent is either helpful or essential. Unfortunately, the tradeoff is that most free standing tents are smaller, heavier, or both at the same time.
Other changes and updates include:
Zpacks Double-Hook Apparatus (yes, that’s what it’s called). But what is it, you ask? This is another improvement for the tent. It’s a nifty little, double-hook fastener that allows you to cinch the door flaps of the outer tent tight (without putting too much strain on the door’s zipper), and allows each flap of the door to be opened independently. We tried out this setup on a test run in the Florida Keys, and we’re now converts. The double-hook apparatus cleverly solves one of the most annoying challenges that arises from two people having to share the same tent door with a central zipper. We each can decide when and if we want the door flap on our side of the tent open or closed, without having to commit one of the flaps to being permanently staked down for the night.
Enlightened Equipment Revelation 10-degree Down Quilt. If you look closely at our WWR packing list, you will see that PedalingGuy actually carried two sleeping bags across the country. That’s because his previous, allegedly 20-degree down quilt did not live up to its specs. It only worked well to about 45 degrees, then PedalingGuy was left shivering. So he supplemented it with a second, very lightweight bag. This two bag system was versatile for any temperature, from warm to well below freezing. But ultimately he decided that it was too heavy, too bulky, and too cumbersome to unpack and pack up every day. He has replaced his two bag system with the Enlightened Equipment Revelation 10-degree Down Quilt. In addition to having more down for warmth, this new bag is the “wide” size for more coverage (and it weighs nearly 12 oz less than the previous, 2-bag combo).
Eye masks (for sleeping). This may not seem like a big deal… each mask weighs less than a third of an ounce. But when the sun shines for 24-hours a day (as it will for more than a month at the start of our trip) these little masks may be a highly-valued component of our kit.
Toolkit
Rohloff Speedhub oil change kits. We’ll be starting the trip with new oil, so we decided to not carry spare hub oil. We will look for oil replacement kits along the way once we hit 3,000 miles (5,000 km). Based on past experience, we anticipate this won’t be too difficult in North America. But it might be more challenging in Central and South America.
Topeak TSGD2X digital tire pressure gauge. Sadly, our Schwalbe pressure gauge was not compatible with the new Fillmore tire valves. Luckily, the Topeak digital gauge weighs less than an ounce more, and it has a nice big, bright numerical readout. It also allows you to over inflate your tires, and then it displays the air pressure while you bleed air down to the desired amount. All in all, it wasn’t a bad thing to have to switch.
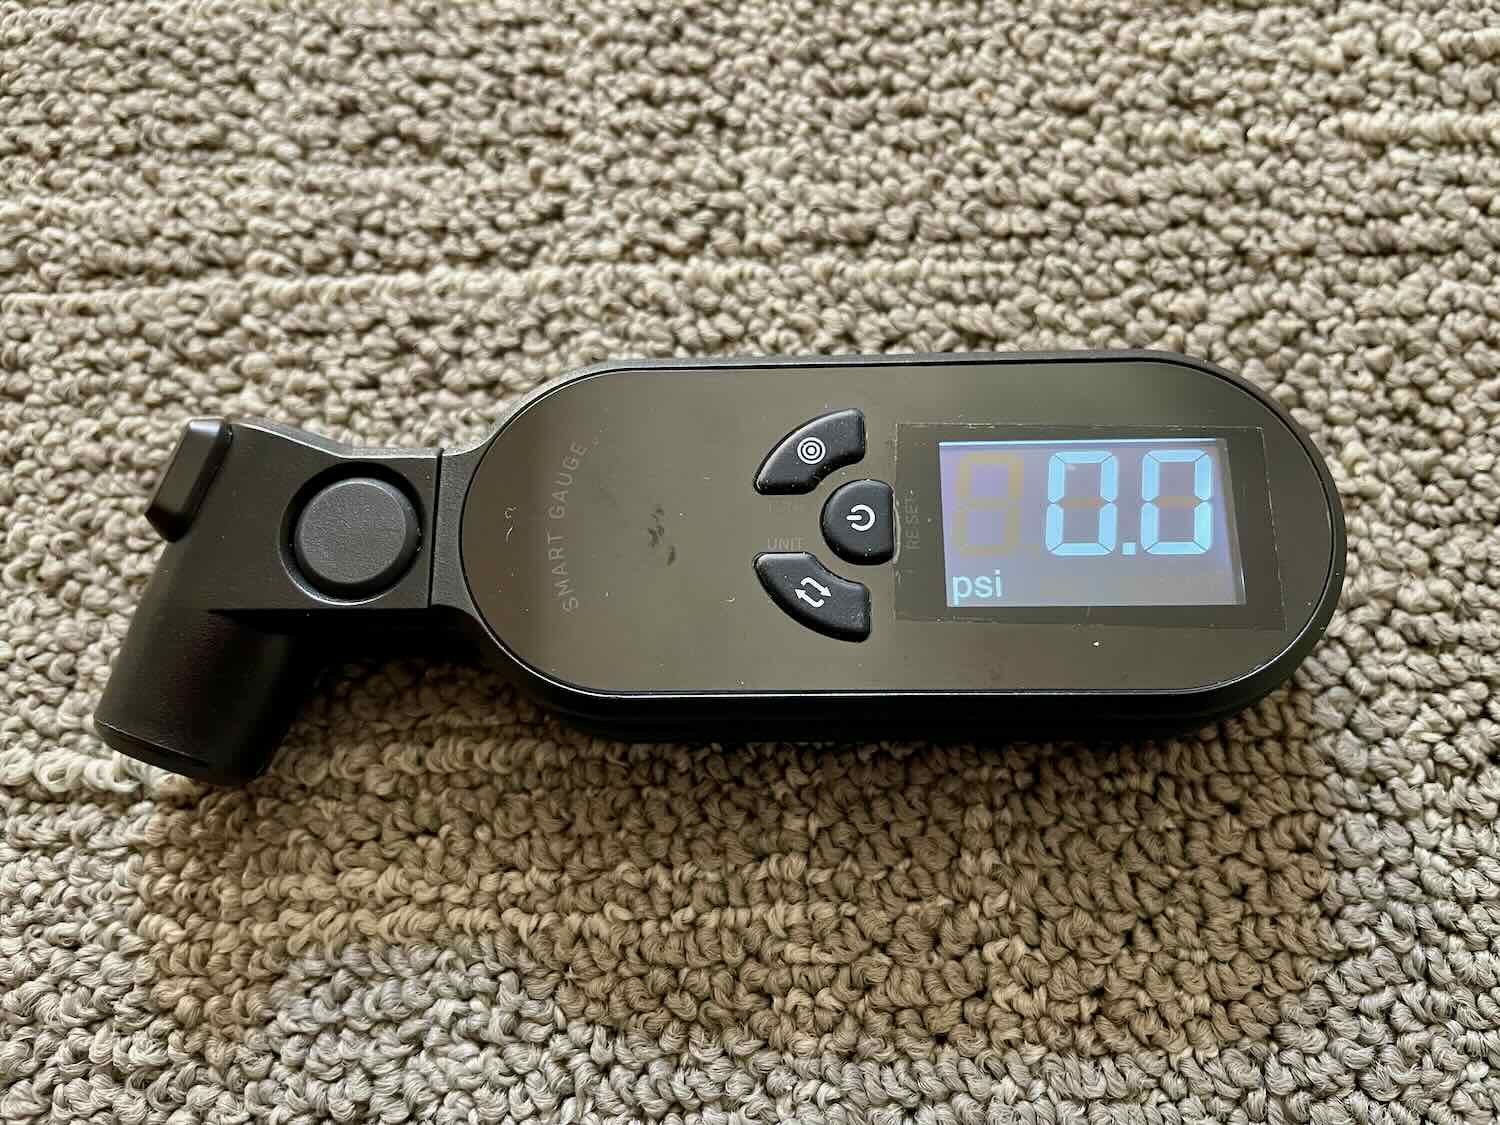
The Topeak TSGD2X digital tire pressure gauge is compatible with our new Fillmore tire valves (replacing our Schwalbe pressure gauge that didn’t fit the new valves). We like the large, bright readout as well as the ability to monitor pressure directly while deflating tires. Copyright © 2019-2022 Pedals and Puffins.
Eating and Drinking
Extra supplemental water storage. To lighten the load, we’re only taking two Platypus 2.0L collapsible bottles each, until we reach southern California. The 2L collapsible bottles are mainly carried for reserve water during long stretches without obvious water sources, and probably won’t be used much in the early parts of the trip. These bottles are in addition to three 1.5L bottles and two 1.0L bottles on each bike. Once we get to the deserts of Baja, we will add more water capacity. At that point we’ll need to go back up to six 2.0L bottles each, before heading onto the Baja Divide.
Camping Stove. We’re starting out the trip with the same Soto WindMaster canister stove that we used on the WWR (including the MSR universal canister stand). Fuel canisters are relatively easy to procure in North America, and nothing beats the reliability/ease-of-use of the Soto WindMaster. But fuel canisters are a lot harder to come by in Latin America. So before striking out on the Baja Divide, we plan on switching to a Trail Designs Sidewinder Ti-Tri stove that works with three types of fuel (denatured alcohol, wood, and esbit solid fuel tablets). Supposedly, denatured alcohol should be easy to procure in most places we will be cycling. That’s the plan, anyway.
Camping Pot. An Evernew 1.9L Titanium Pot will accompany us on this trip (replacing our MSR 2.5L ceramic pot). The most important reason for this change is that the Sidewinder stove sleeve must precisely fit our pot, and the Evernew pot is the correct size for our stove. We’re pretty sure the 1.9L volume will be sufficient, because we really didn’t need the full 2.5L capacity of the MSR pot while cycling the WWR. As an added bonus, the Evernew pot is a full 2.0 oz lighter than the MSR pot. That sealed the deal.
Water Purification. We are a little risk averse when it comes to water, and carried way too many chlorine tablets (Aquatabs) on the WWR. Out of 800 tablets, we ended up using less than 30, in large part because our Katadyn 1.0L BeFree water filter (which we will bring on this trip) never failed us, and we are not big fans of the aftertaste from chlorine tablets. So on this trip we’re saving about 3.5 oz by only bringing 175 tablets from the start. We’ll add more if needed before heading into Mexico.
Accessories & Miscellaneous
Big Agnes Copper Spur HV UL3 tent footprint. This was another item where we went back-and-forth, trying to decide whether to add it to our kit. But at 8.0 ft x 5.5 ft (2.4 m x 1.7 m) it’s a great size for a rain tarp or all-purpose ground cloth in camp, and something we didn’t have to purchase since we already owned one. In western Canada and much of Latin America, damp and rainy conditions will be a lot more common than we’re used to. So, at 8.5 oz, the footprint is coming along to help keep us and our stuff a little drier.
Bug Jackets. Here’s one last addition in recognition of the huge influence mosquitoes will have early on our trip in Alaska and Canada. We’ve owned these jackets for 35+ years… so long that it’s impossible to identify the manufacturer or brand. As far as we can tell, nothing like them is made anymore. Basically, they’re constructed from loosely woven, cotton & nylon yarn. You soak them in insect repellant, and wear them over your clothes. The advantage is that the very loose weave is very breathable and comfortable in hot weather (much more so than the modern, no-see-um-grade mesh that uses a very tight weave to keep bugs out). The downside, of course, is that the insect repellant can rub off on your skin and other gear. Plus, at appx. 6 oz each they’re a couple of ounces heavier than modern designs. But since we already owned these, we decided to take them along. At some point, when the bugs become less formidable, we will lighten our load by discarding them.
Luci Lux Pro inflatable solar lantern. Lighting will not be a problem for the first couple of months of cycling. In fact, we won’t encounter any actual darkness for well over a month (although the sun will set at some point, twilight will continue all night). So lugging around a camp light didn’t make much sense, and this lamp is staying home - at least until we’re back in the lower 48 states.
Drain Cover. This is actually a handy item when sink-washing cloths, but it’s just not essential. We’ve used it less and less over time, as we’ve become more adept at hand-washing laundry in the sink. So it was time to retire the drain cover.
Miscellaneous. There were lots of other small changes, especially carrying fewer “spare” items. Like all long distance cyclists, we managed to shave a few ounces here and there, to streamline our gear and lighten our load.
What Did These Changes Accomplish?
Even though we added a few big items like the footprint/ground cloth, bug jackets, Topeak seat bag, and some extra clothing, we were able to reduce the weight of our gear by about 0.5 lbs (225 g) on each bike, from what we carried on the WWR cycling trip. That may not sound like a lot, but we more than offset all the additional items we added, and saved a little weight in the process. Every little bit counts out on the road!